Sep 19, 2012

15 Most Impotent Internet Safety / Security Tips

Below are the Internet Safety Tips that may help u in keeping safe your info without getting hacked on Facebook or on other internet sites too.
internet safety tips
Tips  1: Don’t click on links or open attachments that look suspicious. If it looks weird or sounds too good to be true, don’t believe it.


Tips  2:  Be careful where you enter your password. Just because a page on the Internet looks like Facebook or another site you use, it doesn’t mean that it is. If you ever have doubts about whether a link is real, simply type the website’s URL (ex: http://www.facebook.com) into your address bar.

Tips  3:  Be suspicious of any email or message that contains an urgent request or asks you to update your information or provide new information. If it sounds off or too good to be true, it probably is. 

Tips  4:  Be suspicious of emails or messages with misspellings or bad grammar, especially if they’re from someone who is usually a good writer.

Tips  5:  Make sure you have an up-to-date web browser (ex: Internet Explorer) armed with an anti-phishing blacklist. Facebook supports:
Tips  6:  Get up-to-date security software on your computer that includes anti-virus, anti-spyware, anti-phishing, and a firewall.

Tips  7:  Set your operating system (ex: Windows) to update automatically.

Tips  8:  Add security questions to all of your online accounts. This will come in handy if you ever lose access and need to prove who you are.

Tips  9:  Facebook will never ask you for your password except to login in. Never send your password in an instant message or an email.

Tips  10:  Use different passwords for all of your online accounts. If you use the same password everywhere, if that password was ever stolen you could lose access to all of your accounts at once.

Tips  11:  Choose a password only you would know. Don’t pick a word from the dictionary. Try to use a combination of at least eight letters, numbers, and symbols.

Tips  12:  Remember that you choose what you share and with whom you share it. Think before you post or give out information, especially if that information is sensitive or personal.

Tips  13:  Be careful when accessing or sending information over an unsecured public wireless network. Don’t send sensitive information if you can’t verify that a Wi-Fi network is secure, or turn on HTTPS from the Account Settings menu.

Tips  14:  Enable link scanner of your Anti-Virus program.

Tips  15:  Most of the hackers use adult content to attach their phishing link. So be careful in extra when you are visiting any adult site or content.

Be smart to surf on internet.

Sep 14, 2012

All In One Facebook Tips & Tricks | Apps | Hacking | Security

Would you like to surprise your friends with a cool status update by using color bold text, animation picture or just a empty massage? or just wanna send daily free sms from Facebook to your international friends.

In this eBook you will find the A-Z Facebook Tips & Tricks, Most interesting Apps that should surprise you, Some basic hacking and how to protect yourself from hacking etc.
all in one Facebook magic tricks
Here is a quick view of the lessons:

1. Facebook Tips & Tricks
Facebook Tips
How to find Facebook Number
How to access Facebook from G mail
Facebook Emotions codes
How to download Facebook in your PC
Download your Information
Import your blog in Facebook
How to find if somebody hacked your Facebook account
How to change your name in Facebook
Export Email addresses of your Facebook account
How to create Facebook ID card
How to hide your Email address from Facebook apps
How to Delete and Terminate Facebook account
How to Download Facebook photo album
How to add a forum (discussion board) to a page
Face book antivirus
How to alert Facebook fan page in your E-mail
How to Show who is online on Facebook when you are in offline mode
How to send SMS using Facebook
How to find new pages you might like
How to watch streaming TV on Facebook
How to create a map of your Facebook friend
Animated picture in Facebook
Colored text, bold, underline, smiles in Facebook status
How to disable Facebook Timeline
How to disable Public search of your Facebook profile
How to Publish your Empty status
How to Surf Blocked Facebook

2. Facebook Web Apps
How to Schedule Facebook massages Sendible
How to get Facebook updates on your Email
How to updates Facebook without using Face book
How to be notify when friend changes jobs
How to view Facebook Profile History
How to Flip Facebook status updates
How to find Shared videos on Facebook
Capture the wisdom of your social Network
Monitor your child Facebook activity
Manage your personal & professional image
How to track Facebook Activities
Create mosaics Profile picture on Facebook
Online store on Facebook
Online Face book Messenger
How to Analysis Facebook Fan page
How to find who un friends you
How to download Videos from Facebook
How to create slideshow of your Facebook album
How to Create Custom Facebook tab
How to get Face book in Excel
How to connect Google docs to Facebook

3. Facebook Software & Plugins
Facebook Color Changer
Facebook adds blocker
How to connect Facebook, Twitter& Google
Facebook Toggle all
Facebook based web browser
Facebook E mail grabber
How to connect outlook to Facebook

4. Facebook Hacking & Security
Facebook phishing
Facebook Password Decryptor
Web browser Pass view
How to Hack Facebook using Keylogger
How to delete Your friend Account within 24 hours
How to protect your Facebook account from Hacking
How to protect yourself from Keylogger & phishing attack

Download Links:
PDF File

Courtesy for this eBook goes to  Tajbir Ahmed. Lets give a huge thanks to him if you found this eBook useful in any way.

Sep 8, 2012

How To Create A Multi-bootable USB Flash/Pen Drive!

Would you like to use a single flash drive to setup Windows XP, Windows7 or Linux without making it bootable for every setup! If so, the keep reading...
Multibootable pen drive
There are lots of software available out there to make a flash drive bootable, you can make bootable flash drive for xp, 7 or Linux easily with one of them.  But what..if you want to make a Multi-bootable flash drive for those OS s, not individually?

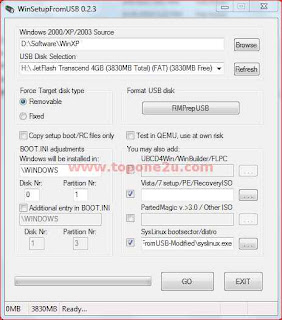
WinSetup will allow you to create a multi-bootable USB flash drive for Windows XP, 7 and Linux Os s Setup. You will be able to setup following os s with a single bootable flash drive without making it bootable every time:).


Instructions to create Multi-Bootable Flash drive:

Step  1: Download WinSetup and extract rar files.

Step  2: Connect your flash drive [8GB recommended] to your computer.

Step  3: Open WinSetup software and set preferences like file paths, flash drive location etc. You can use  ‘RMPre USB’ button to format and prepare your flash drive for this process, if this wasn’t ready.

Multibootable pen drive
Step  4: Finally press GO! And wait for some time, until it showing up the massage Done! Of course, don’t forget to copy 2 files from the folder bootfiles to your flash drive when you finish it.

Thank you, and if you have any complicity or any problem to understand any steps...please feel free to share it. I’ll get back to you.

Sep 6, 2012

Turn Your Desktop Internet Connection Into A WiFi Hotspot

Would you like to share your internet connection over to your room and use the same connection for Laptop, Mobile Phones or other devices without any kind of cable connectivity, but you don’t have any expensive wireless router! if so, don’t worry. 

Now you can use your internet connected desktop or laptop as a WiFi hotspot easily. Yes, many people use Connectify software for this. But some people have trouble with this software. Another thing, its provably costs you some money to use the full version...so, whatever Connectify is!
WiFi Hotspot Creator
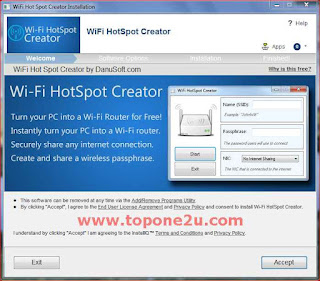
I am talking about ‘WiFi Hotspot Creator’ . its an alternative of Connectify pro. Download this software from here.

Now go for using instructions:

Step  1: Install WiFi Hotspot Creator and restart your PC.
WiFi Hotspot Creator1
Step  2: Open the program and set your hotspot information as seen bellow. then press Start to start using your newly created WiFi hotspot.
WiFi Hotspot Creator2
Note: Installation should take 5-10 Min to complete. And you must have .net farmwork v.4 installed on your PC to run this program.

Please feel free to leave your comment or suggestion!

Sep 3, 2012

Top 10 Ultimate Tips for Troubleshooting Hardware Problems!

I have posted five most Common Troubleshooting Techniques & Strategies in my previous post. In this post i am going to share the 10 ultimate tips that should help you to troubleshoot your computer easily.
computer troubleshoot repair
Tip  10: The Right Tools Make all the Difference
Most PC techs have the basic set of tools, of course, like several sizes of Phillips screwdrivers and some tweezers. But having the following items in my tool chest has saved me more than once from having to hit the hardware store:

Torx screwdriver. Torx is that funky six-pointed star type of screw that a few ornery PC manufacturers (Compaq is a particular offender) like to use to keep ordinary people from working on their own PCs. Without a Torx screwdriver, you're…well…what the screw is.

Flashlight. I carry one of those Black & Decker snake lights with me for those times when I'm trying to distinguish between the network card and the modem card underneath a dark desk. A self-supporting flashlight that you can point in various directions is much more handy than one you need to keep a hand on at all times.

Compressed air. Yes, you can use compressed air to blow dust bunnies out of a computer case or from beneath keyboard keys, but it actually has many other uses. For example, it makes whatever you spray very cold, so you can use it to cool down an overheated chip. I have also used it successfully to blow a dropped jumper block out of a crevice that I couldn't reach into.

Extra jumper blocks. Speaking of jumpers, if you do drop or misplace one, having extras means you don't have to spend the rest of the afternoon crawling around on the floor looking for it. There are several sizes, so keep a variety on hand.

Extra screws. The same goes with screws -- if you carry extras, you don't have to worry about the ones you drop and can't find again. Get a variety of sizes.

Masking tape. Masking tape is helpful for securing a cable to a desk temporarily after you've unplugged it (so it doesn't drop down behind the desk where you can't reach it). And since you can write on it, you can wrap a piece around each cable you remove from a motherboard and write a little note on it about where it was plugged in.


Tip  9: The Symptom Is NOT Always Indicative of the Problem
One lesson I have learned the hard way is not to assume that the symptom is the actual problem. Case in point: Video. When you start up a computer and you don't see any video on the screen, your first thought might be "bad video card." That answer is correct only about 50 percent of the time. Other reasons are a faulty processor, a bad motherboard, bad jumper settings on the motherboard or a memory error. I have even seen cases where a bad adapter card, such as a SCSI card, threw the whole system into such a funk that no video appeared.

The same goes with memory errors. Don't assume that a DOS or Windows error that talks about bad memory necessarily means that your RAM is physically bad. Many underlying causes, such as operating system file corruption and overheating, can simulate a memory error.


Tip  8: Use a POST Card
When troubleshooting no-video startup problems, one of the most invaluable tools I've found is a POST card. No, it's not the kind you mail. POST stands for Power On Self Test, and a POST card is a circuit board you insert into any open bus slot in the motherboard. When you turn on the power, the POST card's digital display provides a numeric code that lets you know at what point the boot process is hanging. Then you look up that code in a book that comes with the card, and you've got your answer.


Tip  7: Take It All Out and Rebuild
Another way to troubleshoot no-video is to remove all nonessential items from the motherboard, leaving only the power supply, the memory, the processor and the video card. If you still get no video with only these items in place, there's still troubleshooting to do, but at least you've narrowed down the possibilities considerably.
computer troubleshoot repair
A few additional tips from that point:

If you hear no beeps from the PC speaker, the memory is probably not the problem.
If there is any drive activity at all, it's probably not the processor.
If the cooling fan on the processor is spinning, it's probably not the power supply.


Tip  6: Suspect the Power Supply
There are two problems that can occur with a power supply. One is that it's faulty, the other is that it's overloaded. Both can potentially result in puzzling errors.

With a faulty power supply, the system probably won't boot at all. It'll seem completely dead. That's because of the built-in safeguard in the power supply called the Power Good pin. When you turn on the power supply, it sends a +5v charge through the Power Good pin to the motherboard. If the motherboard receives it (or at least receives between +3v and +6v), it starts up the system. If it receives nothing, or any other voltage, it puts itself in a state of perpetual reset, with the end result being that nothing happens.

Some faulty power supplies are faulty only intermittently. Such problems can result in seemingly random disk errors and system problems. If you've tried everything else to troubleshoot a particular system, you might try a new power supply.

Some power supplies might be perfectly good but insufficient for the amount of stuff that's been jammed into the PC. For example, after you add a new CD-RW drive to a system, you might suddenly start having boot up problems. The computer might start to boot okay, then go haywire when the drives start spinning up. That's because disk drives require about twice the wattage when they initially spin up than they do once they get going, so an under-powered power supply is going to freak out during the drive spin-up phase. Underpowered systems can also experience post-startup errors during activities that access multiple drives at once, like copying a CD-ROM or transferring files from a hard disk to a floppy disk.


Tip  5: Try the Easy Fix First
Another lesson I've had to learn painfully in my career: Try the easy fix first. If you're having problems with a CD-ROM drive, for example, try swapping out the ribbon cable before going to the trouble of taking out the whole CD-ROM drive.

Swapping cables is an easy fix that a lot of technicians forget about. You can test a cable using a multimeter with the resistance (ohms) setting, pin-by-pin, to see whether any wires inside are broken. However, if you're like me, you have a whole drawer of ribbon cables in your shop, and it's much easier just to try a different cable and worry about the old one's condition later.

Along the same lines, many technicians forget to try a different power connector for a drive, or a different motherboard slot for an adapter card. It's so annoying when you find the problem that way after trying all the harder fixes first!


Tip  4: Carry Boot Disks for All OSes
I work for many different clients, and I never know what operating system I'm going to find on a client PC. When the OS won't boot from the hard disk, a bootable floppy is just the ticket, but many systems are fussy about the OS version of the boot disk matching the OS version installed on the hard disk. For example, if you are working with a Windows Me PC and boot it with a Windows 98 startup disk, and then try to use FDISK, you can potentially run into an Incorrect Operating System Version message.

That's why I try to carry boot disks for all Windows versions in my tool chest. Some OSes don't have boot disks per se (Windows NT, 2000, and XP come to mind), but for these you can carry CD versions and then set up the PC's BIOS to boot from the CD-ROM. From there you can abort the setup utility that starts automatically and get to the Recovery Console, a command-line interface you can use for troubleshooting.


Tip  3 The Two Phone Jacks on a Modem Are Not Interchangeable.
On most modems there are two identical-looking phone jacks, labeled either with words or pictures. One is for the Line (the incoming phone line) and the other is for the Phone (the telephone unit). On most modems the labeling is extremely difficult to see; you have to get right up on it with a flashlight.

If you get the lines reversed, all manner of odd things can happen. The modem might not find a dial tone at all, or it might find a dial tone but emit sharp beeps or honks as it operates. (My US Robotics modem does that. It's quite bizarre sounding!) Or the line might be all staticky such that you can't get aconnection speed higher than 28.8 or so on a 56K modem.


Tip  2: Device Problems Are Often Plug-and-Play Related
If a newly installed device doesn't work, 90 percent of the time it's not the device's fault -- it's a Windows thing. Windows is supposed to be able to do Plug-and-Play detection for new hardware, but any variety of quirky things often happens instead:

Windows might detect the device incorrectly. For example, it might detect your fine new video card as Standard VGA.
Windows might not be able to determine the device type. For example, it might detect your modem as Unknown PCI Device.
Windows might not have any free IRQs available, so it might force the new device to share with some other device with which it has a conflict.
Windows might not notice the new device at all.
When a new device fails to work right out of the box, here's the troubleshooting routine I go through:

Run the setup software that came with the device. This will often install the correct drivers in Windows and make the device work.
Check Device Manager in Windows to make sure there is no resource conflict; resolve it if one is found.
Remove the device from Device Manager and have Windows re-detect it.
Visit the device manufacturer's Web site to see if an updated driver or patch is available that will resolve the problem.


Tip  1: Suspect Overheating
Overheating is such an insidious character in PC troubleshooting because it can cause no end to seemingly random, unrelated errors. For example, suppose you have a client experiencing random lockups and reboots. You ask what the problem is, and she says it sometimes happens when she runs her e-mail program and other times when she is using Microsoft Word. What's really going on is the processor fan isn't spinning up, and after five minutes or so the computer overheats. Five minutes after she turns on her PC, she is usually checking her e-mail or using Word, so those factors are just red herrings.

Whenever a computer has a problem intermittently, without any seeming pattern related to activity, the first thing I check are the cooling fans. Is the power supply fan blowing? Is the processor fan spinning? Is the cooling mechanism for the processor (fan or heat sink) firmly attached to the processor?

One easy way to tell whether overheating is an issue is to blow compressed air on the chip. Compressed air is very cold so it cools the chip off. If it starts working correctly after that, you know that overheating is the problem.
Courtesy to: Original post.

Please feel Free to Comment or Post your Suggestions!

Most Common Troubleshooting Techniques & Strategies

Here are five common-sense techniques and strategies to solve common computer hardware problems that should help you to solve your computer basic problems by yourself. and make you not to go for a computer engineer, also help you to save some money..provably.
troubleshoot computer technique
(1) Trial-and-error

Personal computers are highly modular by design. The most powerful trouble-shooting technique is to isolate the problem to a specific component by trial-and-error. Swap compatible components and see if the system still works. Try different peripherals on different machines and see if the same problem occurs. Make one change at a time.

(2) "It's the cable, s!"

More than 70% of all computer problems are related to cabling and connections. Ensure all cables are connected firmly. IDE and floppy ribbon cables and power cables can often go loose. Ensure microprocessor, memory modules, and adapters such as video card and sound card are inserted correctly and didn't "pop-up" during transportation.

(3) Don't be frustrated!

Don't be afraid of computer problems. It is often the best opportunity to learn. Trouble-shooting is part of the fun of owning a computer. Imagine the satisfaction you could get by solving a problem yourself.

Of course the fun could ran out quickly once you are frustrated and have spent too much time on the same problem. If you feel frustrated, it's time to leave it for a while and go back with some new ideas or call someone who can help. Rule of thumb: You shouldn't spend more than three hours on the same problem at one time.

(4) Take notes!

Take notes of what you have done and all the error messages. You may need to use them later. For instance, when you see an unusual blue screen with an error message, copy the entire message onto a piece of paper. In many situations, that message may point to the right direction in getting the problem solved quickly.

(5) Take a look?

It's OK to open a computer case and take a look inside. There is only 5V and 12V DC voltage supplied to the components outside the power supply. Those who have never seen the inside of a computer are often amazed by how simple it looks. Of course, still always power down and unplug the power cord first.
Courtesy to: Original Post.

Please Feel Free to Leave Comment!